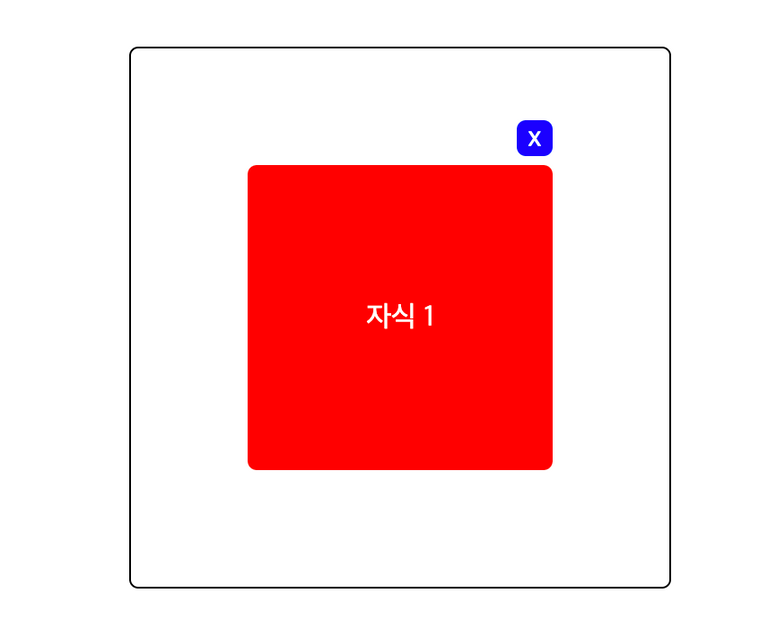
개발을 할 때 시간이 오래걸리는 내 모습을 보면서 ‘어떤 부분이 부족한 걸까’ 고민하기 시작했다.
모든 부분에서 한 없이 부족하지만, 가장 부족한건 Typescript와 CSS였다.
이번에 사이드프로젝트를 진행하며, CSS에 대해 복습하고 새롭게 내용을 정리해보자
1. aspect-radio
- 원본 이미지 비율을 유지하면서, 크기를 조절하고 싶을 때 aspect-ratio를 사용하면 된다.
- 특히 모바일 뷰를 개발할 때 모바일의 크기가 모두 제각각이다.
이를 대응하려면aspect-radio를 사용하는 것이 좋다.
// 실제 이미지를 모달창으로 구현할 때 모바일 width / height를 고려해서 aspect-ratio를 사용했다.
.letter-bg {
  width: 100%;
  height: auto;
  aspect-ratio: 598 / 708;
  background-color: white;
  background-image: url('/images/letter-bg.png');
  background-repeat: no-repeat;
  background-size: contain;
  background-position: center bottom;
}
1-1. 예외상황
- aspect-radio가 적용되지 않는 3가지 예외상황이 있다.
- 특히, CSS는 예외상황을 알지 못할 경우에도 에러로 알려주지 않으니 주의해야한다.
- width, height가 고정으로 지정되었을 경우.
- 마찬가지로 min-height, min-width와 같이 고정으로 지정되었을 경우.
- 내용이 element의 크기를 넘어갈 경우.
2. inline-block, inline, inline-flex
진짜진짜 매번 헷갈린다.
inline-flex는 사실 처음 알았다;
다른 요소는 이전에 정리해놓은 내용이 있다. 인용해서 다시 복습해보자
2-1. inline
참고로 inline은 in the same line이라고 이해했다.
즉, 같은 줄에 위치할 수 있다.
 <div>나는 Div-1이다</div>
 <span>나는 span-1이다.</span>
 <span>나는 span-2이다.</span>
 <span>나는 span-3이다.</span>
 <div>나는 Div-2이다</div>
div {
background: yellow;
width: 200px;
height: 50px;
margin: 20px;
padding: 10px;
}
span {
background: red;
width: 100px;
height: 20px;
margin: 10px;
padding: 5px;
}구분이 명확하지 않아, 키워드별 경계선을 추가했습니다. 🙇♂️
-
inline는 너비와 높이가 없음

inline은 width와 height값을 지정하면 다음과 같이 warning이 뜬다. - background-color하면 색이 적용되지 않음.
- 하지만 문자, 또는 어떤 내용이 들어 있을 경우 색이 적용된다.
-
inline는 margin과 padding을 줄 수 있음
- span(inline)는 margin을 사방으로 주더라도 좌/우만 적용되는 것을 확인가능
(명확히 하기 위해 padding은 잠깐 주석처리했었음)
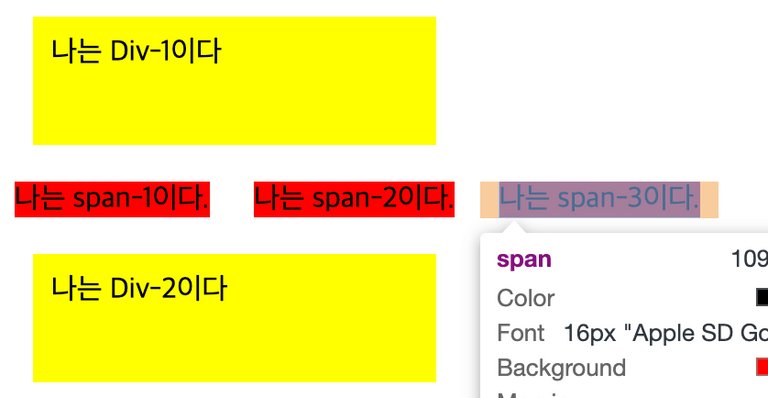
margin을 상하좌우로 10px씩 주었지만 좌우만 적용 됨 - padding은 전 방향 모두 줄 수 있음
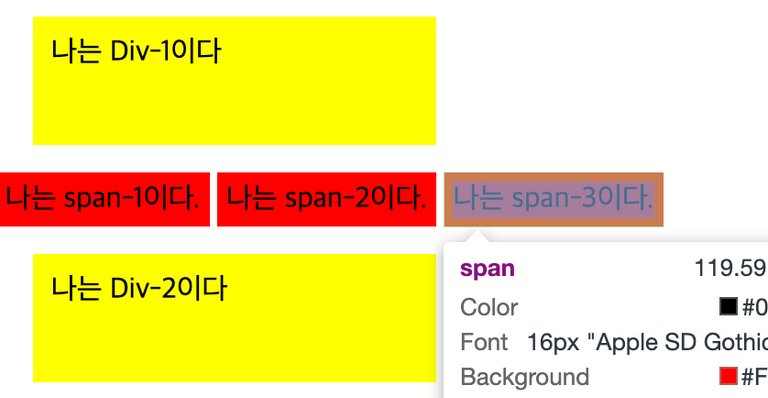
padding을 상하좌우로 5px씩 주었을 때, 모두 적용 됨
단, 이 블로그에서 제시하듯이, inline은 height값이 없기 때문에, position이 block인 element와 수직으로 놓을 경우, 겹치는 부분이 생긴다. 이를 해결하기 위해선 inline-block을 사용해야 한다.
- span(inline)는 margin을 사방으로 주더라도 좌/우만 적용되는 것을 확인가능
-
inline의 종류는
span,a,img가 있음 (나머진 대부분 Block)
2-2. inline-block
- inline-block은 inline과 block의 특징을 모두 가지고 있음
- 즉, inline처럼 같은 줄에 위치할 수 있고, block처럼 너비와 높이를 가질 수 있음
// 위에 제시했던 코드에서 다음의 CSS만 변경햇음
div {
  display: inline-block; // inline-block으로 변경
  background: yellow;
  width: 200px;
  height: 50px;
  margin: 20px;
  padding: 10px;
}

span {
  display: inline-block; // inline-block으로 변경
  background: red;
  width: 100px;
  height: 20px;
  margin: 10px;
  padding: 5px;
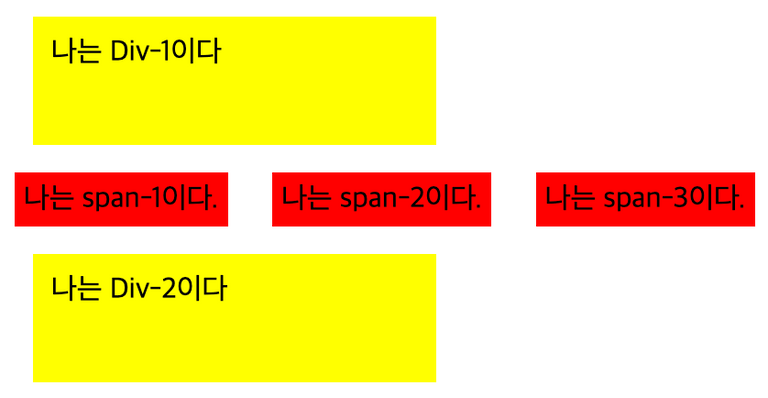
}- 위에서 언급했듯이, span은 inline이 default이고, div는 block가 default이다. 이를 inline-block로 변경했다.

- 먼저 위 이미지를 보고, block은 inline-block으로 변경되면서 inline처럼 같은 줄에 위치할 수 있게 되었다는 것을 알 수 있다.
- 그리고 inline이었던 span은 너비와 높이를 가질 수 있게 되었다는 것을 알 수 있다.
- 즉 내부는 block 속성을, 외부는 inline 속성을 가지게 된 하이브리드 형태이다.
- inline-block는 대표적으로
button,input,select가 있다.
2-3. inline-flex
update: 2025-03-15
inline-flex를 재정리한 글을 업데이트 했습니다.
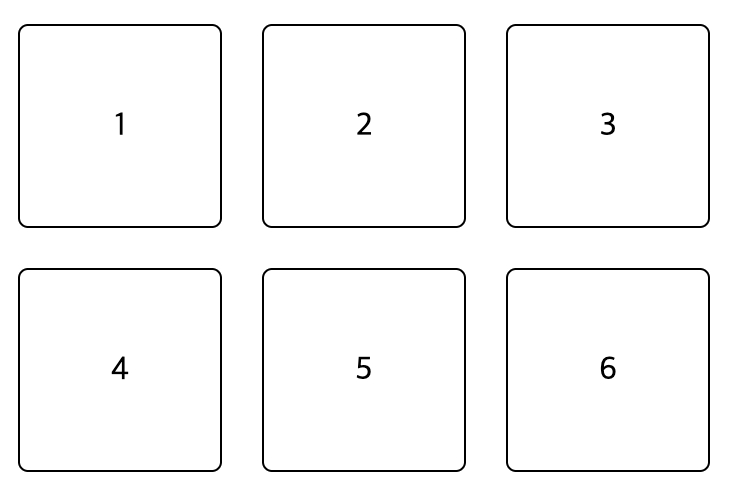
- 다음과 같은 코드가 있다.
<div class="flex">
    <div class="div-box">1</div>
    <div class="div-box">2</div>
    <div class="div-box">3</div>
</div>
<div class="flex">
    <div class="div-box">4</div>
    <div class="div-box">5</div>
    <div class="div-box">6</div>
</div>
.flex {
display: flex;
}
.div-box {
width: 100px;
height: 100px;
background-color: white;
border: 1px solid black;
border-radius: 5px;
margin: 10px;
display: flex;
justify-content: center;
align-items: center;
}- 위 코드는 다음과 같은 이미지로 나타난다.
.flex {
  display: inline-flex; // inline-flex로 변경
}

.div-box {
  width: 100px;
  height: 100px;
  background-color: white;
  border: 1px solid black;
  border-radius: 5px;
  margin: 10px;

  display: flex;
  justify-content: center;
  align-items: center;
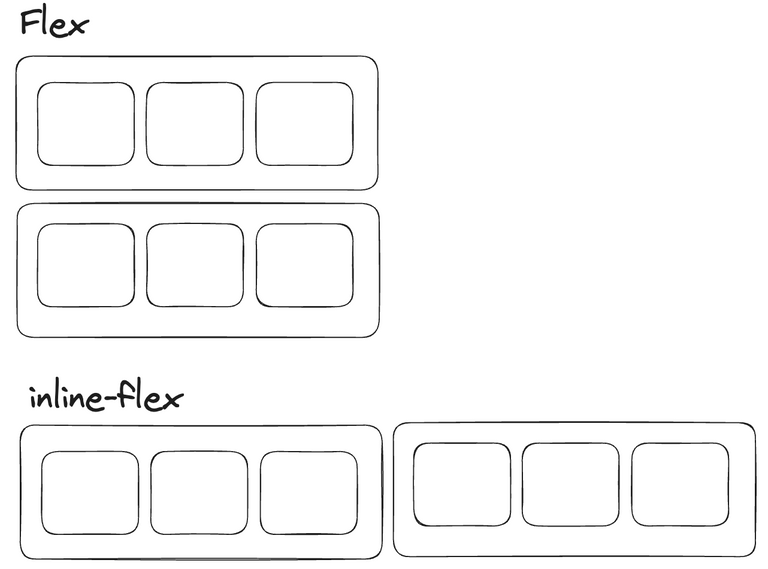
}- flex에서 inline-flex로 변경해주었다. 그 결과는 다음과 같다.
- 즉 이를 정리해보면 다음과 같다.
- flex 컨테이너가 inline-flex로 변경되면, 수직으로 쌓이던 flex-item들이 수평으로 쌓이게 된다.
3. relative와 absolute
매번 헷갈리는 absolute와 relative, 더 나아가 position..
3-1. position: relative
<body>
  <div>
    <div class="green"></div>
  </div>
</body>
div {
width: 300px;
height: 300px;
color: white;
background-color: wheat;
}
.green {
background-color: teal;
width: 100px;
height: 100px;
}.green {
background-color: teal;
width: 100px;
height: 100px;
position: relative; // relative를 주었을 때
right: 20px; // right를 주었을 때
left: 30px; // left를 주었을 때
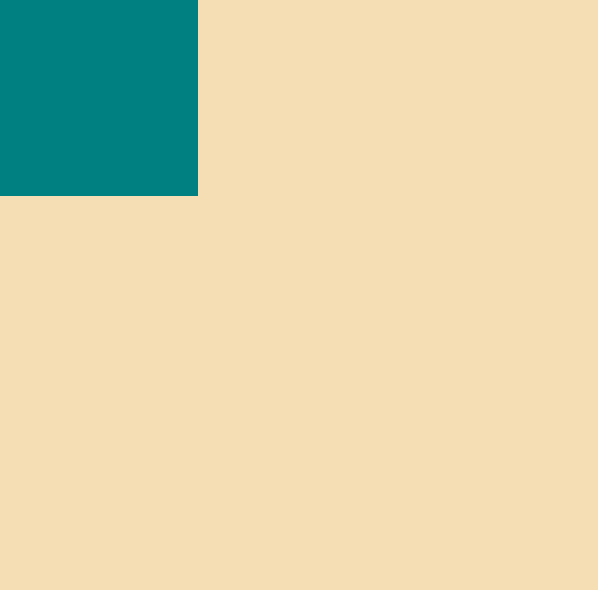
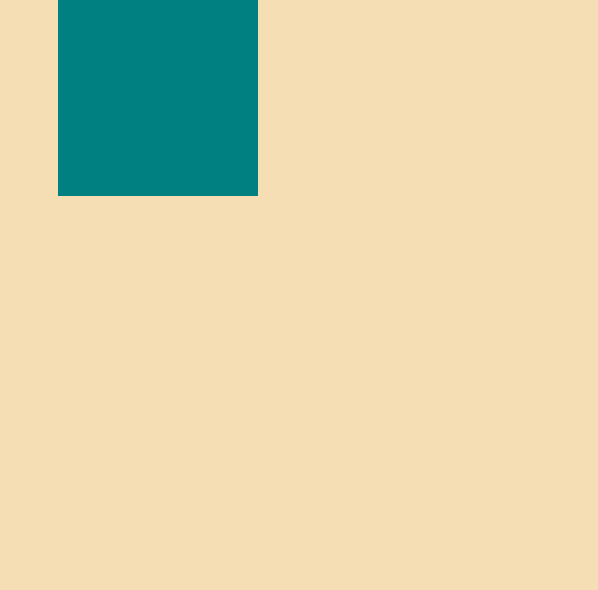
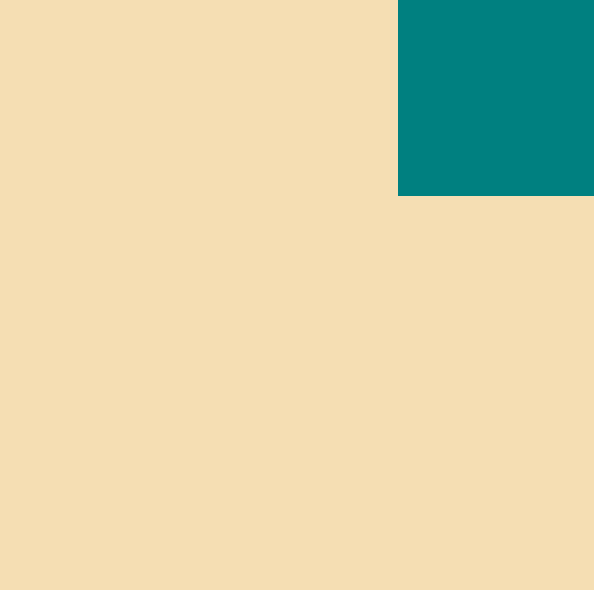
}- 모두 동일하게 유지한 상태에서
position|right|left를 주었을 때 다음과 같은 결과를 보인다.
-
즉 relative는 elemnt가 처음 위치한 곳을 기준으로 움직인다는 것을 알 수 있다.
-
right로 20px을 주면, 왼쪽으로 움직이는데, 반대방향으로 움직인다고 생각하지말자
top|bottom|left|right는 웹페이지 상에서 element의 오프셋(offset)을 지정하기 위해 사용된다.- 즉,
top은 위에서 얼마나,left는 좌측에서 얼마나,bottom은 아래에서 얼마나,right는 우측에서 얼마나 떨어져야하는지를 결정한다. - 해당 내용은 여기를 참고해서 작성했다. 지금까지 내가 헷갈렸던 내용을 명확히 이해할 수 있게 해주었다.
3-2. position: absolute
.green {
  background-color: teal;
  width: 100px;
  height: 100px;
  position: absolute; // absolute를 주었을 때
  right: 0px; // left를 주었을 때
}- relative와 모든 게 동일한 환경에서 position과 right만 변경해주었다.

- 현재의 absolute는 부모인 div를 벗어나, body를 기준으로 움직인다.
- default인 body를 div로 변경해보자.
div {
  width: 300px;
  height: 300px;
  color: white;
  background-color: wheat;
  position: relative;  // div에 relative를 주었다.
}

.green {
  background-color: teal;
  width: 100px;
  height: 100px;
  position: absolute;
  right: 0px;
}- 이렇게 이동할 수 있는 기준이 무엇일까? 다음을 확인해보자
<div>
  <div class="sibling"></div>
  <div class="green"></div>
</div>
div {
width: 300px;
height: 300px;
color: white;
background-color: wheat;
}
.sibling {
width: 100px;
height: 100px;
background-color: red;
position: relative; // sibling에 relative를 주었다.
}
.green {
background-color: teal;
width: 100px;
height: 100px;
position: absolute;
right: 0px;
}
- class가 green인 div박스에 형제 div인 sibling class를 추가해주었다.
- 그리고 sibling에 css로 position relative를 추가해주었다.

- 즉, 부모 요소 중에서 position 속성이 relative인 요소가 있다면
이 부모를 기준으로, absolute를 줬던 자식요소를 자유롭게 배치할 수 있다.
4. user-select, pointer-events
4-1. user-select
- 위와 같은 상황이라고 가정해보자
- 이럴 경우 이미지나 요소들이 선택되지 않도록 막아주는 방법은 없을까..?
모바일에서 웹뷰로 제작할 시, 유저가 이미지를 드래그하면 이미지가 선택되어버린다.
- 이를 해결하기 위해선 다음과 같은 방법이 있다.
// 위 이미지는 다음과 같은 HTML로 구성되어 있다.
<section>
  <div
    style="
      //...
      user-select: none;   /* user-select: none을 주었다. */
    "
  >
    <img style="//..." src="./images.png" />
    <input
      style="
        //...
      "
      readonly
      value="귀여운 강아지"
    />
  </div>
</section>- 이렇게 하면 더 이상 이미지가 선택되지 않는다.
- user-select 속성은 유저가 텍스트를 선택할 수 있는지를 지정해주는 속성이다.
- 위와 같이 div에 user-select: none을 주면, div 내부의 모든 텍스트가 선택되지 않는다.
- 하지만 input의 readOnly로 준 value는 여전히 선택이 가능하다.
4-2. pointer-events
- 위와 같은 현상을 막아주기 위해, pointer-events를 사용할 수 있다.
// 위와 같은 HTML로 구성되어 있다.
<input
  style="
    //...
    pointer-events: none; /* pointer-events: none을 주었다. */
  "
  readonly
  value="귀여운 강아지"
/>- pointer-events는 사실 클릭 이벤트를 막아주는 속성이다. 즉, 위와 같이 선택을 막아주는 요소는 아니다.
- 그래서, 만약 readOnly가 아니라면, 사용해선 안된다. input 박스를 클릭했는데, value를 변경할 수 없게 되니 말이다.
나의 경우엔, input / textarea가 readOnly인 경우에만 pointer-events를 사용했다.
5. 같은 형제 구조에서 absolute를 강제할 수 있는 방법은 없을까?
absolute를 형제 구조를 기준으로 위치를 다시 잡을 순 없을까?
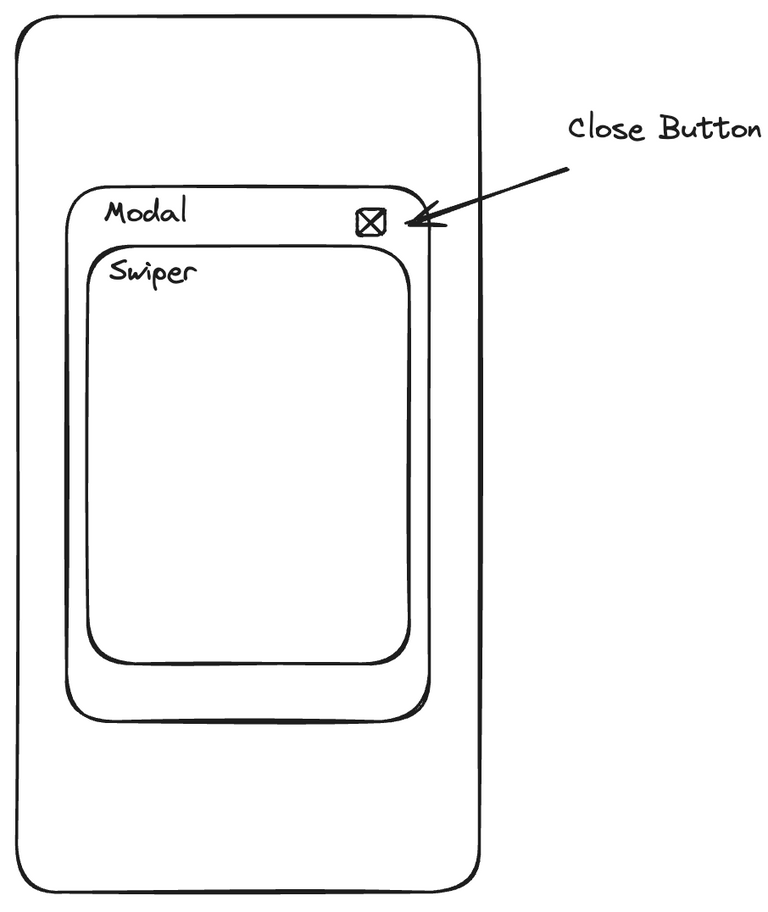
- 다음과 같은 코드가 있다.
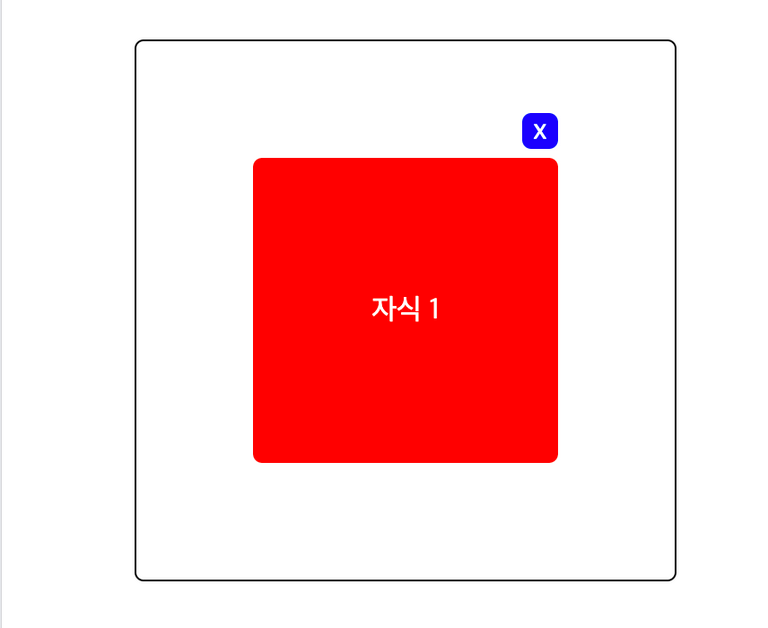
- 요구사항은 다음과 같았다.
- 자식 1의 북동쪽 꼭지점을 기준으로 5px 위에 자식 2를 위치시킨다.
- 아래와 같이 간략한 코드를 구성해봤다.
  <section id="modal" class="layout">
    <div id="swiper" class="parent">
      <div id="contents" class="child-1">자식 1</div>
      <div id="close-button" class="child-2">x</div>
    </div>
</section>- 여기서 이제
close-button을 어떻게 contents의 위에 놓을 수 있을까?
5-1. layer 층을 하나 더 두기
- 가장 먼저 생각난 건, relative와 absolute를 사용하는 것인데, 이를 위해 layer층을 하나 더 두는 것이다.
  <section id="modal" class="layout">
    <div id="swiper" class="parent">
      <div id="add-layer" class="add-layer">  <!-- layer를 추가햇다. -->
        <div id="contents" class="child-1">자식 1</div>
        <div id="close-button" class="child-2">x</div>
      </div>
    </div>
  </section>
//..
.add-layer {
position: relative;
}
.child-1 {
//...
width: 150px;
height: 150px;
}
.child-2 {
// ...
width: 20px;
height: 20px;
position: absolute;
right: 0;
bottom: calc(150px + 20px + 5px);
}- 결국 add-layer를 기준으로 두기 위해 relative를 주고, child-2에 absolute를 주었다.
- 그리고 오른쪽 가장 끝에 위치시키기 위해 right: 0을 주었다.
- 마지막으로 bottom을 주었는데, 이는 child-1의 높이 + child-2의 높이 + 5px를 주었다.
완성은 했지만, 꼭 layer를 하나 더 추가해줘야하는걸까.. 다른 방법은 없을까?
그렇다고, Javascript를 쓰고 싶지도 않았다.
개인적으로 스타일은 최대한 CSS로만 처리하고 싶다.
5-2. anchor를 사용하기
anchor는 현재 정식 반영된 기능이 아니라, 실험적인 기능이다.
먼저 chrome에서 chrome://flags로 들어가서 #enable-experimental-web-platform-features를 활성화해주자.
💬 크롬을 열고 chrome://flags/#enable-experimental-web-platform-features를 url에 붙여넣으면 됩니다!
그 후엔 아래와 같이 polyfill과 class를 추가해주자.
  <head>
    //...
    <!-- polyfill을 추가해주었다. -->
    <!-- https://github.com/oddbird/css-anchor-positioning?tab=readme-ov-file -->
    <script type="module">
      if (!("anchorName" in document.documentElement.style)) {
        import("https://unpkg.com/@oddbird/css-anchor-positioning");
      }
    </script>
  </head>
  <body>
    <section id="modal" class="layout">
      <div id="swiper" class="parent">
        <div id="contents" class="child-1 anchor">자식 1</div> <!--class에 anchor를 추가했다. -->
        <div anchor="my-anchor" id="close-button" class="child-2 mover">x</div> <!--  anchor="my-anchor"와 class에 boat를 추가했다. -->
      </div>
    </section>
  </body>
//...
.child-1 {
//...
}
.child-2 {
//...
}
.anchor {
anchor-name: --my-anchor;
}
.mover {
anchor-default: --my-anchor;
bottom: calc(anchor(top) + 5px);
left: calc(anchor(right) - 20px);
}- 기존의 absolute, relative는 모두 제거했다!
- 그리고 anchor를 사용하기 위해선, anchor-name을 사용해야한다.
- 이제 자식 1을 기준으로, 자식 2를 움직이기 위해 class mover를 추가했다.
- 이렇게 했을 때, anchor-default(자식1)을 기준으로 자식2를 움직일 수 있다.
정리해보면, anchor를 이용하면, javascript를 사용하지 않아도 되고, 래퍼요소를 추가할 필요도 없다.
얼른.. 정식으로 반영되었으면 좋겠다. 🥲
참고자료
-
- inline-block, inline, inline-flex 참고
CSS의 display 속성: inline, block, inline-block
CSS Flex 완벽 가이드
- inline-block, inline, inline-flex 참고
-
- relative와 absolute 참고
CSS의 absolute position 작동 메커니즘 이해
- relative와 absolute 참고
-
- user-select, pointer-events 참고
MDN user-select
MDN pointer-select
- user-select, pointer-events 참고
-
- 같은 형제 구조에서 absolute를 강제할 수 있는 방법은 없을까?
CSS Anchor Is The Best New CSS Feature Since Flexbox
css-anchor-positioning
CSS 앵커 배치로 요소를 서로 테더링
- 같은 형제 구조에서 absolute를 강제할 수 있는 방법은 없을까?
CSS Anchor Is The Best New CSS Feature Since Flexbox

